Setting Up an AVD for Android Penetration Testing
Introduction
In Android penetration testing, having an Android Emulator is mandatory for two key reasons:
1. Continuity of Testing: If the physical rooted test device does not operate or becomes unusable, an emulator allows for continued testing without interruption.
2. Defense Mechanism Testing: Emulators are needed for evaluating the effectiveness of defense mechanisms of Emulator Detection, a requirement of the MASVS-RESILIENCE-1 security requirement in the OWASP Mobile Application Security Verification Standard (MASVS).
From my experience in Android penetration testing, I always prefer using Android Studio’s Android Virtual Devices (AVDs) and Genymotion's Virtual Devices.
This guide will show how to set up an AVD in Android Studio on Windows 11 and prepare it for penetration testing.
Android Studio Installation and Virtual Device Creation
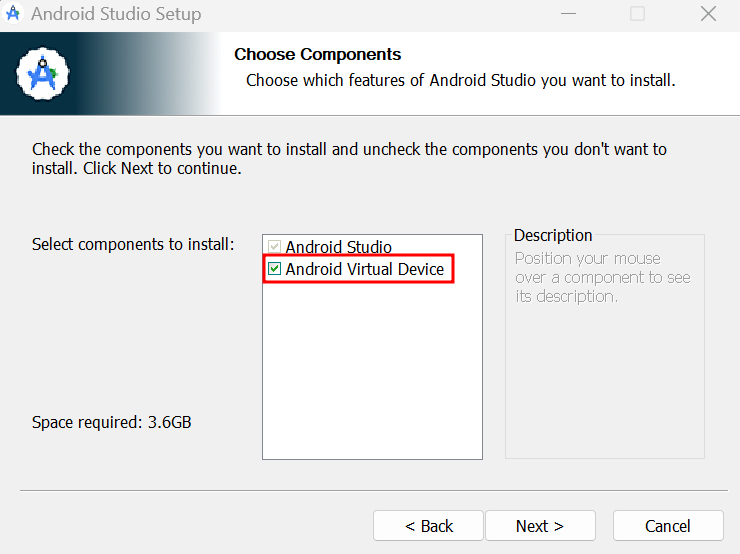
To start, install Android Studio by following the official guide here. During installation, ensure that the Android Virtual Device component is selected.
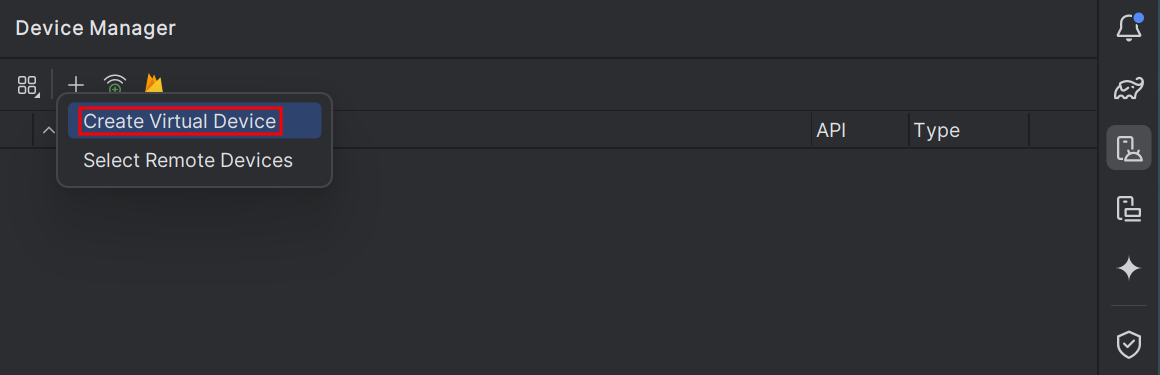
Once installed, open Android Studio, navigate to the Device Manager, click the + button, and select Create Virtual Device to begin setting up a new AVD.
When selecting a device, I prefer to choose one with larger screen dimensions to make it easier to work with.

Next, setting up an Android Virtual Device (AVD) for penetration testing APKs (Android applications) requires careful selection of the configuration to ensure a smooth and effective testing process. Choose an Android version, the Target API, and the Application Binary Interface (ABI).
Creating a New Android Virtual Device
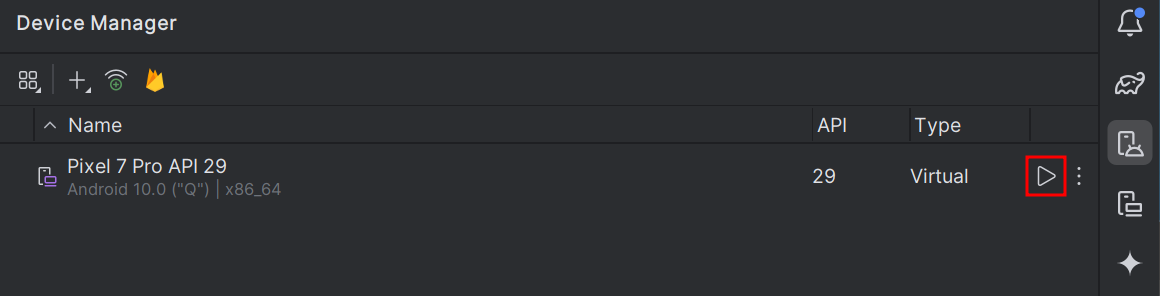
- Android version: Opt for a lower Android version, like Android 10.0 (API 29), to simplify rooting and bypassing security features, allowing for deeper inspection of application behavior. Lower versions also ensure compatibility with testing tools and provide a more straightforward environment than newer ones, facilitating a smoother penetration testing process.
- System Image: Use Default Android System Image as it is chosen for testing in a clean Android environment without any Google services or Play Store components, useful for examining how apps perform on a standard, unmodified version of Android.
- Application Binary Interface (ABI): Choose x86_64 for optimized performance and compatibility with penetration testing tools like Frida and Objection.
Target Selection Criteria
-
Google Play Target: Most common for penetration testing due to its full emulation of a real device with Google Play Services and Play Store, enabling comprehensive testing of app interactions with Google services.
-
Google API Target: Used when testing apps that require Google APIs but do not need the Play Store, providing access to Google services without additional layers from the Play Store.
-
Default Android API Target: Chosen for testing apps in a basic, Google-free environment, useful for examining app behavior without Google services or Play Store interference.
Regarding ATD (Android Test Device) targets, I have never needed to use them for penetration testing, nor do I believe they are necessary for such purposes.
Next, download the specific system image shown in the following screenshot by clicking the download button.

Once downloaded, select it, click Next, and then Finish without making any changes to the settings. The AVD is now set up and can be powered on using the Start button.
AVD Rooting Process
The next step is to root the device to gain full control and effectively utilize penetration testing tools. For this, I recommend using Magisk in conjunction with rootAVD, a script designed specifically to root AVDs.
To proceed with the next steps:
1. Clone rootAVD GitLab repository and navigate to the repository's root directory.
git clone https://gitlab.com/newbit/rootAVD.git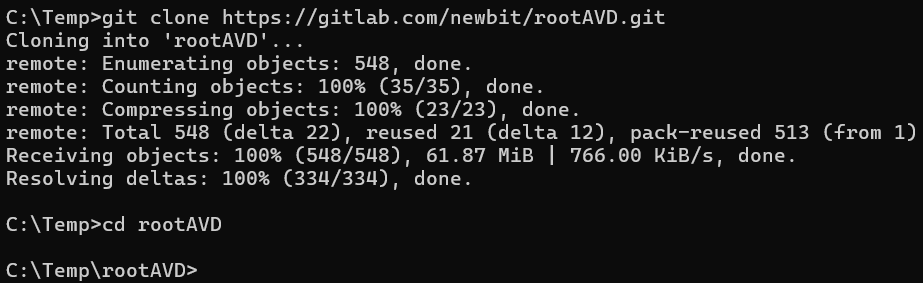
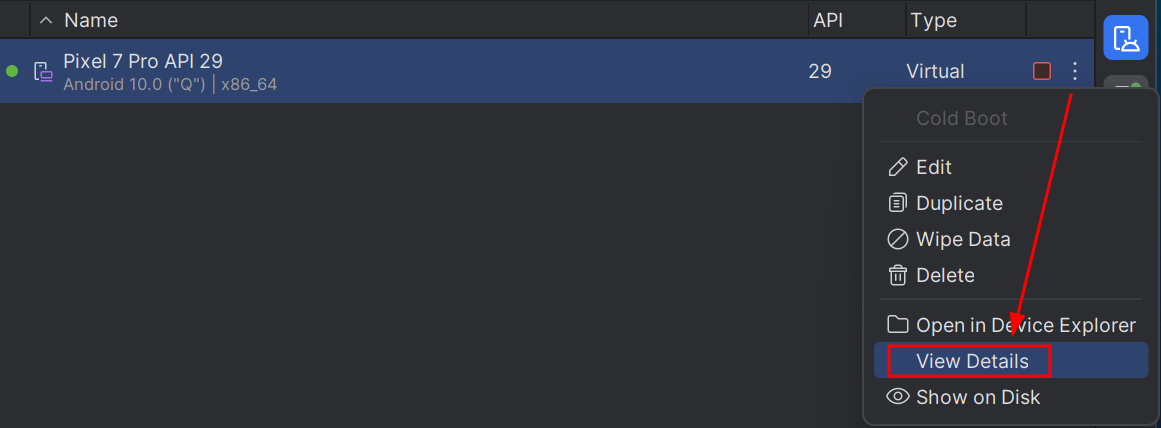
2. Find the system image directory path in the AVD configuration by clicking on the three dots and selecting View Details, then scroll down to find image.sysdir.1. This configuration entry specifies the directory path where the system image for the AVD is stored.
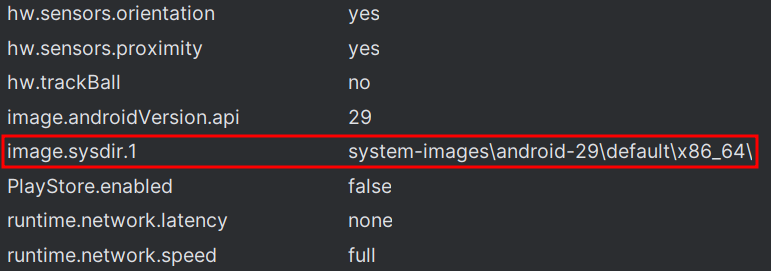
In this example, the directory path is system-images\android-29\default\x86_64\. This path will be needed in Step 4.
3. Turn the device on from the Start button and wait for it to fully boot up.
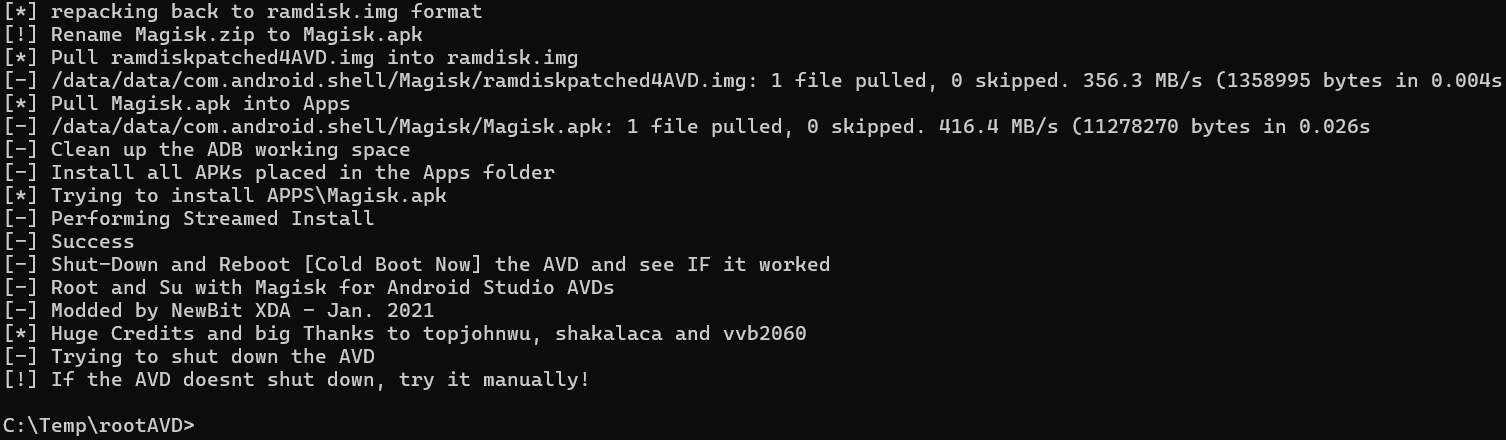
4. Execute the following command to start the rooting process: .\rootAVD.bat system-images\android-29\default\x86_64\ramdisk.img. Note that the ramdisk.img file, located in the directory path specified, contains the necessary system image modifications for rooting. The rootAVD script uses this file to patch the AVD’s system image, thereby activating root access on the virtual device.
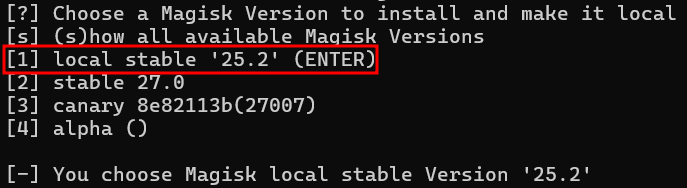
Choose the default stable Magisk version when prompted, by pressing Enter.
After the successful completion of the rooting process, a confirmation message should be shown, and the AVD should shut down automatically. If it does not, shut it down manually.
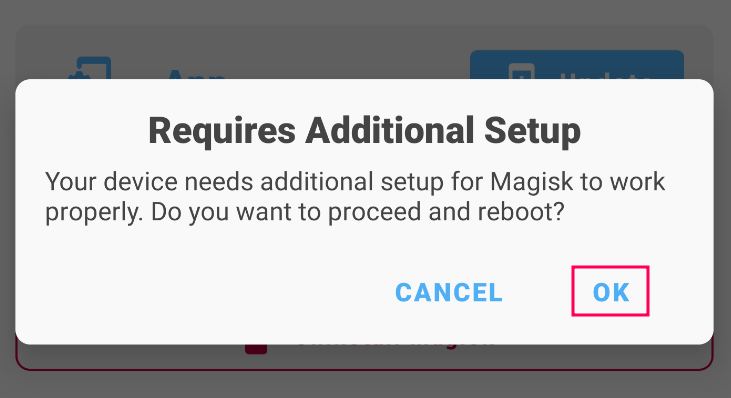
5. Turn the device on, and the the Magisk Manager application should be installed. Upon opening it for the first time, it will prompt that additional setup is required as shown in the second following screenshot. Click OK and the application will automatically reboot in 5 seconds.
After the reboot is completed, also ensure that the following ADB commands are run, which should return the root user.
-
adb shellwithsu: Relies on the su binary being available and properly configured on the device. This method is used to switch to root access within an already open shell session. The first time su is used, it will prompt to grant superuser access. -
adb rootthenadb shell: Provides root access to the ADB daemon itself, affecting all subsequent ADB commands. This method ensures that the entire ADB session has root privileges, not just the shell session.
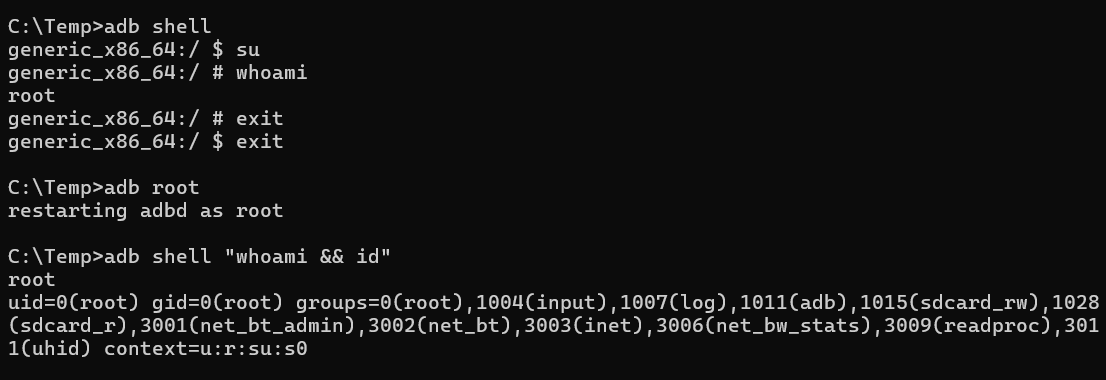
With these steps completed, the AVD is now successfully rooted, as confirmed.
6. After the reboot is complete, open the Magisk Manager application and update it to the latest version. This update is for the Magisk Manager application itself. It updates the user interface and additional features of the application, which are used to manage root permissions, install modules, and configure settings.
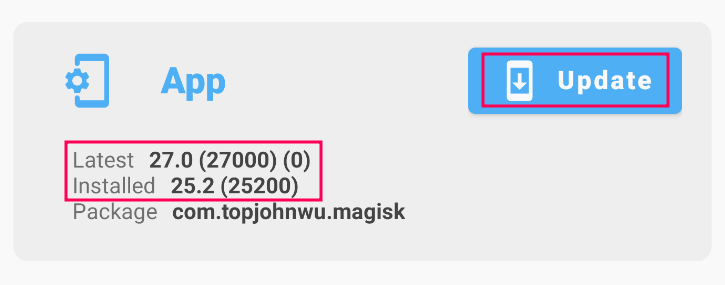
At this point, it should be mentioned that updating Magisk to the latest version could be attempted, but it may fail. Installing the latest version would require TWRP (which will not be covered as part of this walkthrough). In my experience, I always ensure that the latest version is on my physical penetration testing device, where I conduct 95% of the testing. It is suggested to use emulated Android devices only for specific findings like Emulator Detection Bypass and Biometric Authentication Bypass (in case the physical rooted phone lacks fingerprint authentication). I have never encountered issues with a slightly older Magisk version on the AVD.
Magisk Configuration
In the following section, key steps for configuring and optimizing Magisk for penetration testing will be performed.
Magisk Hiding and Zygisk Activation
1. First, hide the Magisk Manager application to avoid detection by Android applications. As shown below, when listing third-party installed apps, Magisk Manager is clearly visible and could be detected by apps checking for its presence.

To hide it, go to Settings in the Magisk Manager application and select the "Hide the Magisk app" option under the App section.
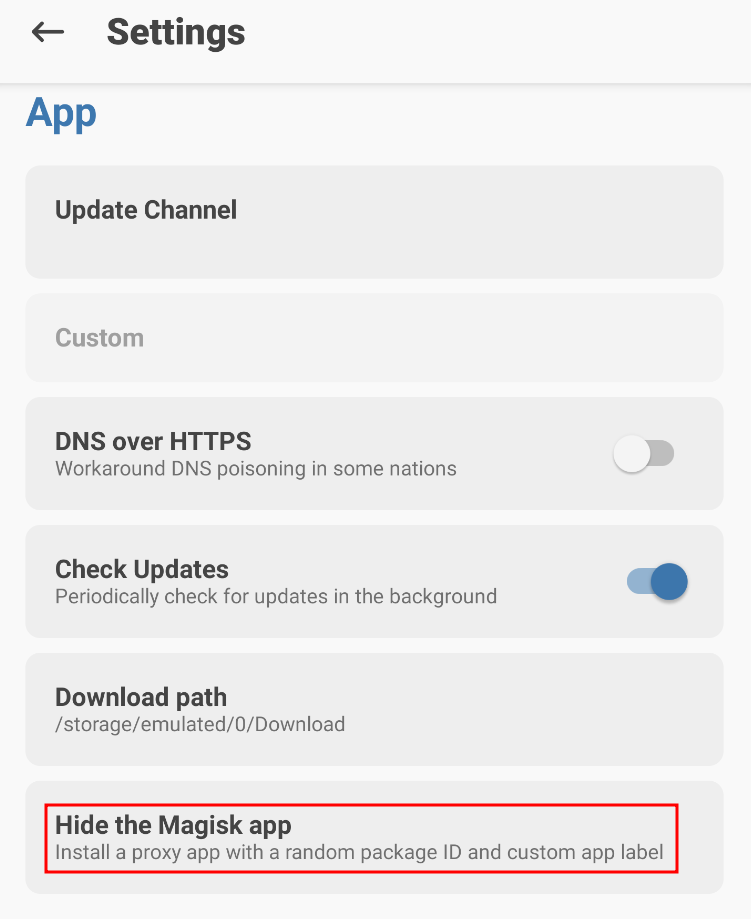
By selecting this option, a proxy app with a random package name will be installed to obscure Magisk Manager, making it less detectable. Additionally, it will prompt to give the proxy app a name. I chose "Settings2", but it can be named whatever is preferred.


By following these steps, the Magisk Manager app will be successfully hidden, and a proxy app will be created to make Magisk less detectable during penetration testing.
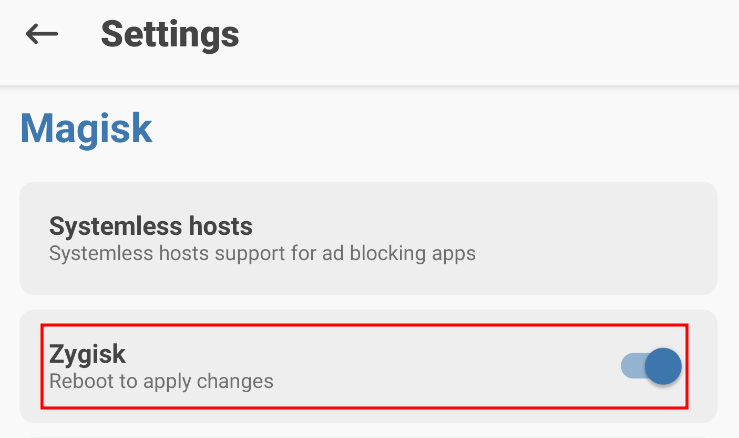
2. Secondly, enable Zygisk in the Magisk Manager application by going to Settings and toggling the "Zygisk" option under the Magisk section. Moreover, ensure that the Enforce Denylist option is disabled, and reboot the AVD afterward.
Zygisk is a crucial feature for Android penetration testing as it allows for systemless modifications by hooking into the Zygote process, which manages Android applications, and supports advanced injection techniques to bypass various application detections.
Magisk Modules Installation
1. Play Integrity Fix is a mandatory Magisk module designed to address Play Integrity and the deprecated SafetyNet, which remains widely used. Its primary function is to help pass the device verdict in integrity tests and certify the virtual or physical device. For effective use, this module should be installed on an AVD configured with the Play Store target, as it relies on Google Play Services. It does not hide root access or handle detections by other applications.
Download the module (zip file) and transfer it to the AVD using the following commands:
certutil.exe -urlcache -f https://github.com/chiteroman/PlayIntegrityFix/releases/download/v17.3/PlayIntegrityFix_v17.3.zip C:\Temp\PlayIntegrityFix_v17.3.zip
adb push C:\Temp\PlayIntegrityFix_v17.3.zip /storage/emulated/0/Download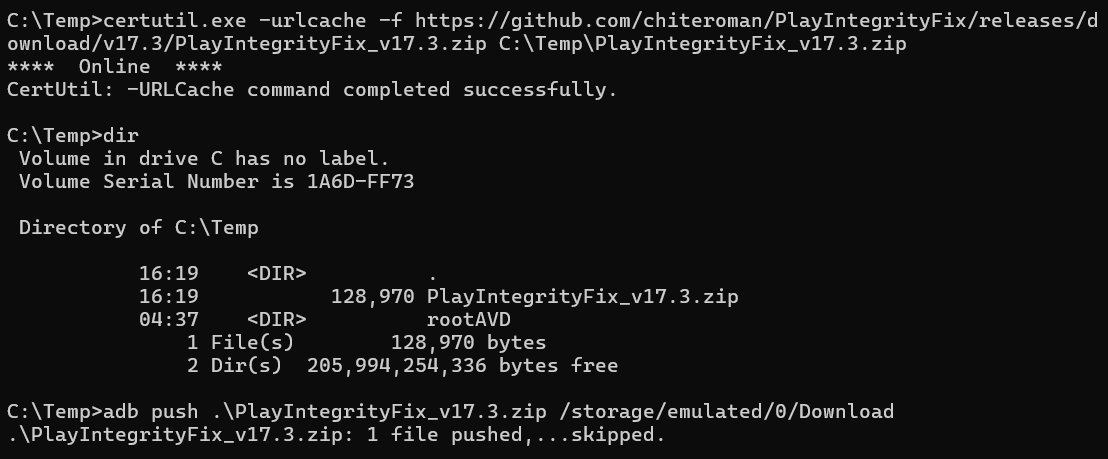
Now that the Play Integrity Fix Magisk module is transferred to the Downloads folder, open the Magisk Manager application (named "Settings2" in my case). Navigate to the Modules section at the bottom of the screen and select Install from storage. Go to the Downloads folder and select the PlayIntegrityFix_v17.3.zip file. It should be and a confirmation message should appear.
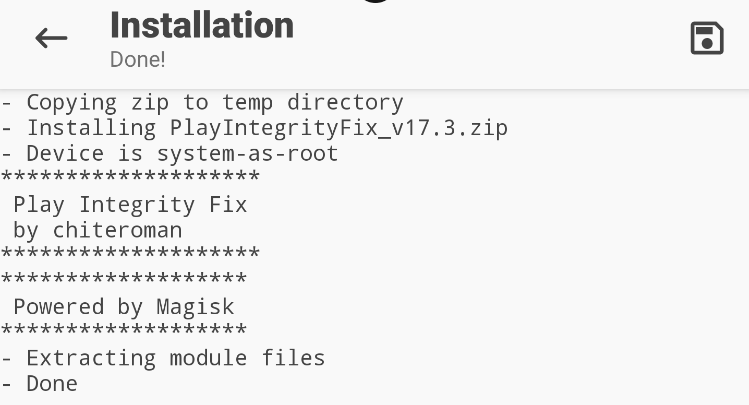
Make sure to reboot the AVD once the installation is completed. Then, Play Integrity Fix Magisk module should be found enabled in the Modules category.
2. Next module to install the MagiskFrida. This Magisk module allows the Frida server to run on boot, bringing the convenience of not having to start it manually each time the AVD is booted.
The Frida server is essential for Android penetration testing as it enables dynamic instrumentation and manipulation of running applications, which is crucial for analyzing and bypassing security measures in combination with tools like Frida and Objection.
Additionally, it automatically installs the correct version of Frida (e.g., x86_64) based on the AVD architecture and it makes it easier and faster to update the Frida server to the latest version directly from the Magisk Manager application's Modules section.
Follow the exact same steps as with the first Magisk module to install it, and the prompt with this message should appear if it is successfully installed.
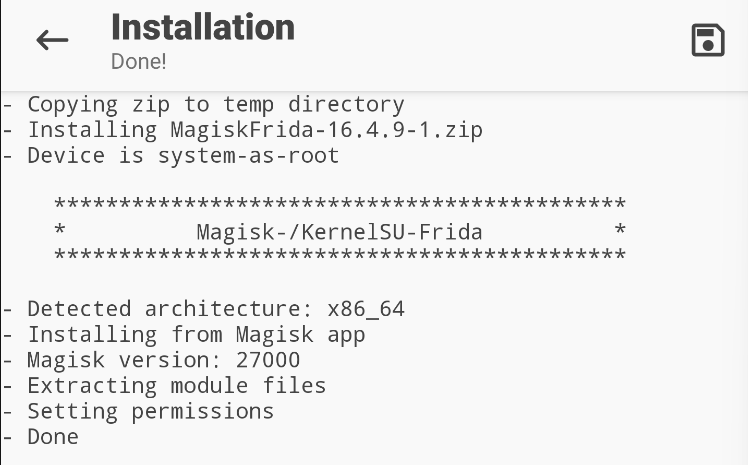
Now, the next time the AVD is turned on, the Frida server will run on boot.
Proxying AVD Traffic
When conducting penetration testing on Android applications, there is also the API penetration testing part where, as a penetration tester, API endpoints should be identified, authentication and authorization models used by the API should be examined, etc. To achieve this, intercepting and seeing all the traffic between the application and its backend services is necessary, and the only way to do this is by using a proxy server.
Keep in mind that some applications may implement certificate pinning mechanisms, which prevent interception and require additional steps to bypass. Additionally, there may be rare scenarios where bypassing VPN and proxy detection mechanisms is necessary to fully view the application's traffic.
Here are the steps to configure the AVD to pass traffic through a proxy server:
1. I prefer using Burp Suite as a proxy for all API and web assessments.
A Burp Suite CA certificate needs to be exported by navigating to Settings, then in the Tools category, select Proxy, and click on Import / export CA certificate and choose Export Certificate in DER Format and save it as cert-der.crt changing its extension to .crt.
Next, transfer the new CA certificate to the AVD with the following command:
adb push C:\Temp\cert-der.crt /storage/emulated/0/Download
To install the CA certificate on the AVD, go to Settings, then select Security, followed by Encryption & credentials, and then click on Install from SD card. Locate the CA certificate in the Downloads directory and click on it to install it. It will prompt for a certificate name; I use "PortSwigger", the company behind Burp Suite. Make sure to set Credential use to "VPN and apps".
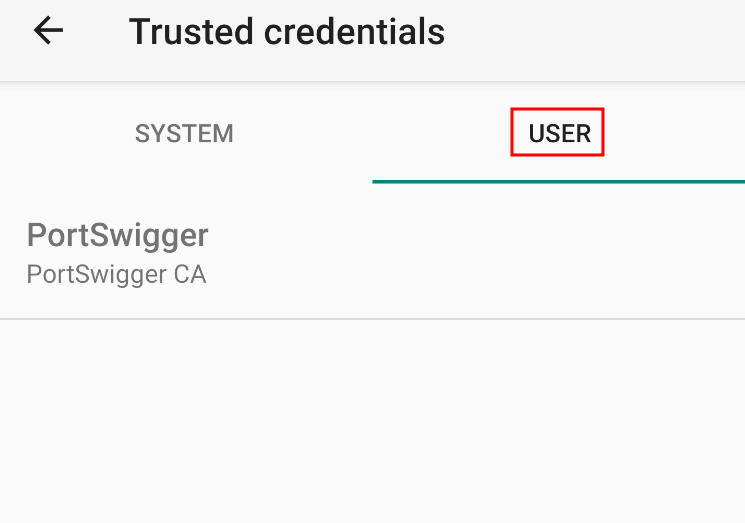
To verify the CA certificate was successfully installed, go to Trusted credentials, and the certificate should be listed under the USER category.
2. The next move is to transfer the CA certificate to the SYSTEM trusted credentials. In API penetration testing of Android applications, transferring the CA certificate to the SYSTEM trusted credentials ensures that all traffic can be intercepted and analyzed, including from apps with strict security measures or certificate pinning, upon bypass, that might otherwise block traffic interception. Having the trusted certificate only in USER trusted credentials may result in incomplete traffic capture and an incomplete API penetration test.
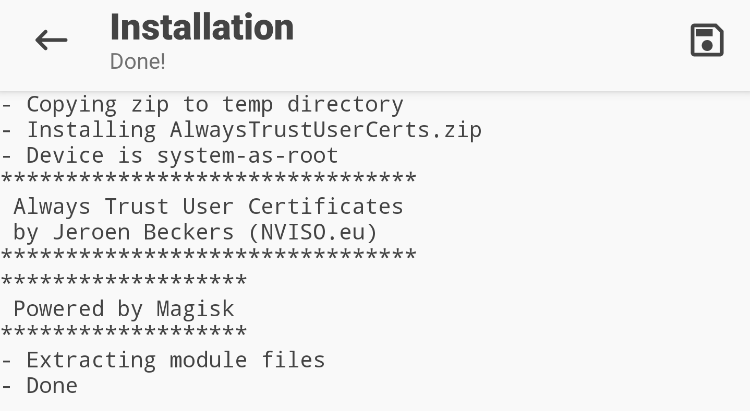
To do this, install the Magisk Trust User Certs Magisk module. Follow the same steps that were used to install the Play Integrity Fix module. Upon successful installation, a confirmation message should appear. After this, ensure that the device is rebooted.
Note: There have been instances where, if the Magisk module was installed before the CA certificate, the certificate did not move to the SYSTEM trusted credentials upon rebooting, enabling/disabling, or reinstalling the module. This issue is specific to AVDs and not to physical devices, which is why the installation of this Magisk module is addressed separately from the Magisk Modules Installation category.
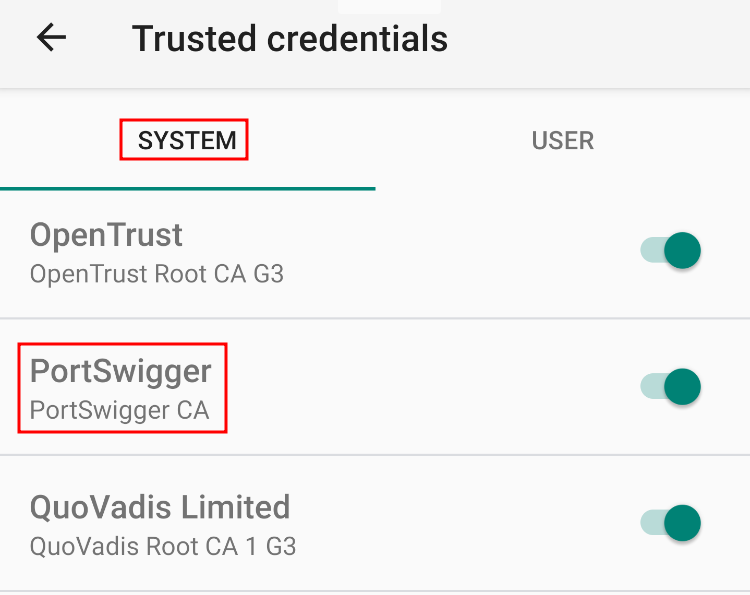
When the device is turned back on, navigate to Trusted credentials again, go to the SYSTEM category, and search for the "PortSwigger" CA certificate. It should be present there as shown in the demonstrated screenshot.
3. Finally, configure Android Studio and the AVD to direct traffic to the proxy server.
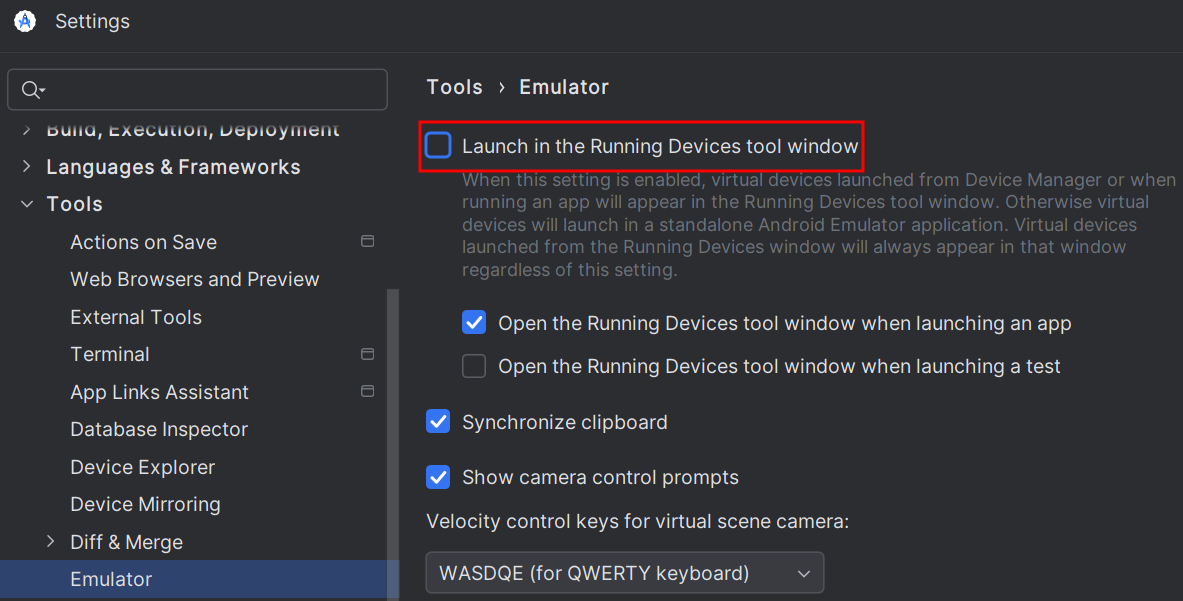
In Android Studio, navigate to File, then Settings, followed by Tools and Emulator, and uncheck the option "Launching in the Running Devices tool window". Hit Apply and OK, then reboot the AVD. Notice that it appears differently now.
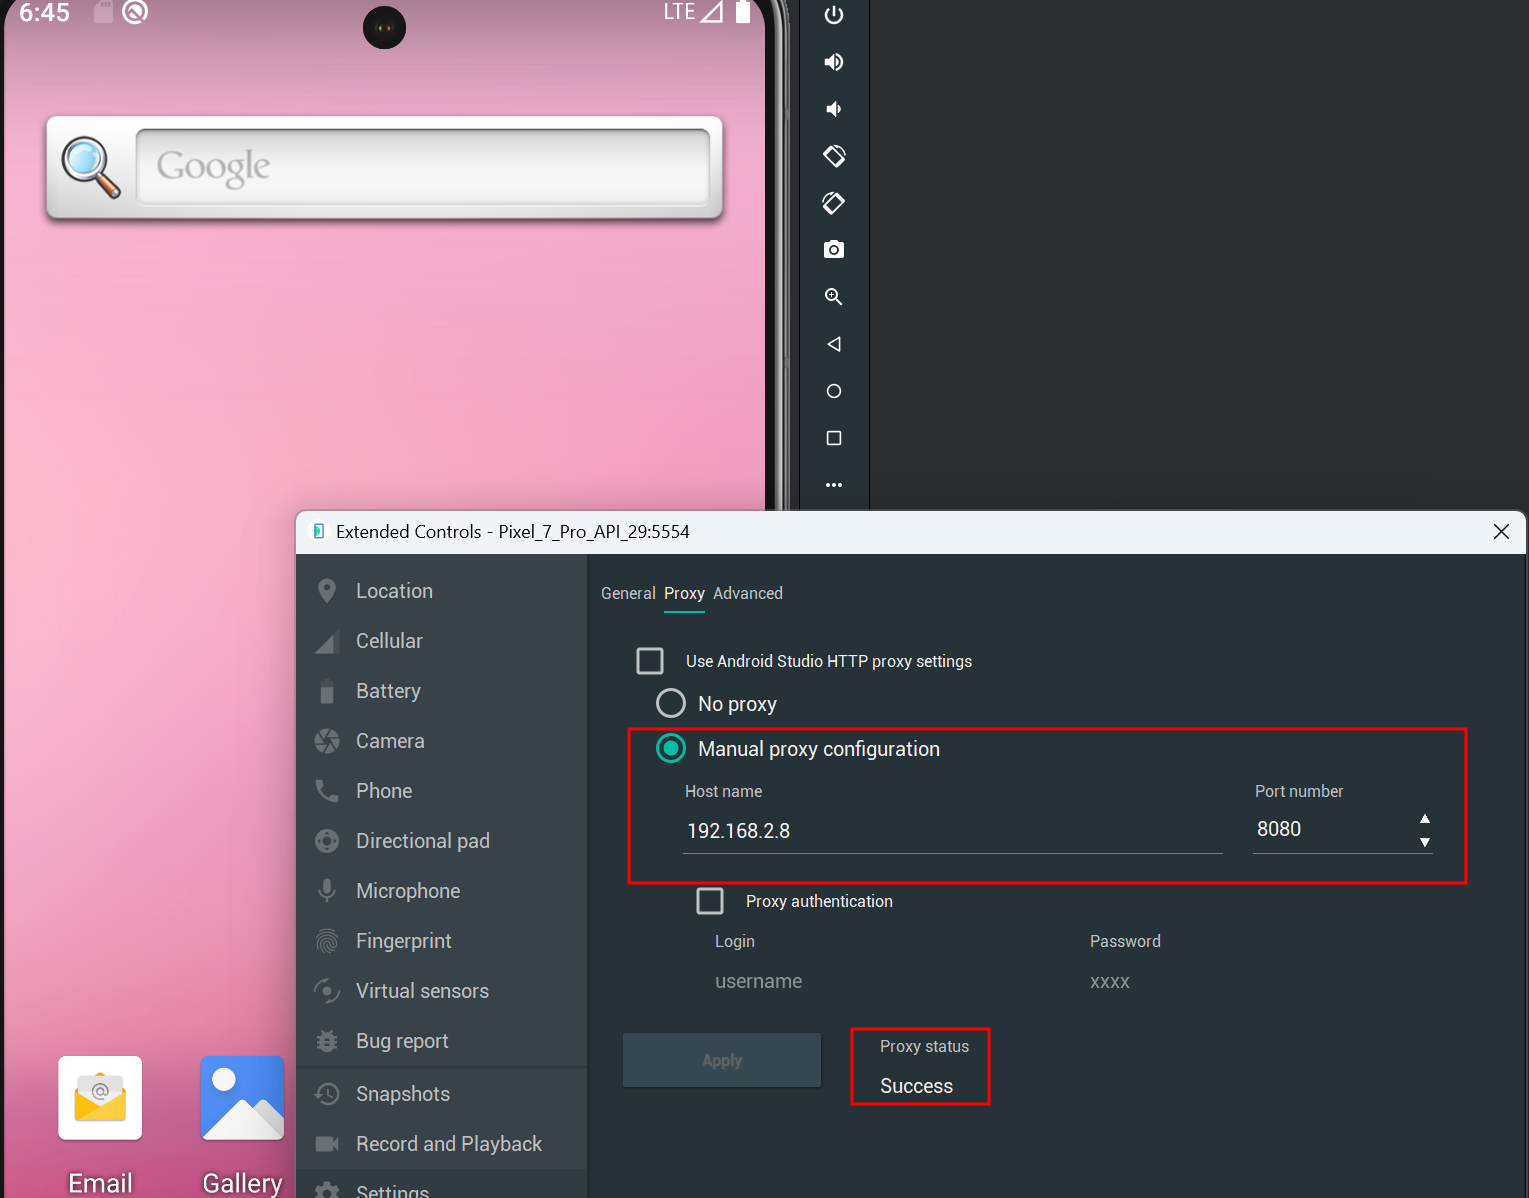
Next, click the three dots on the menu next to the AVD, go to Settings, then select the Proxy tab. Uncheck the "Use Android Studio HTTP proxy setting" and choose "Manual proxy configuration." Enter the hostname or IP address of the proxy server and the port it is using. Click Apply, and if everything is configured correctly, the "Success" message should appear.
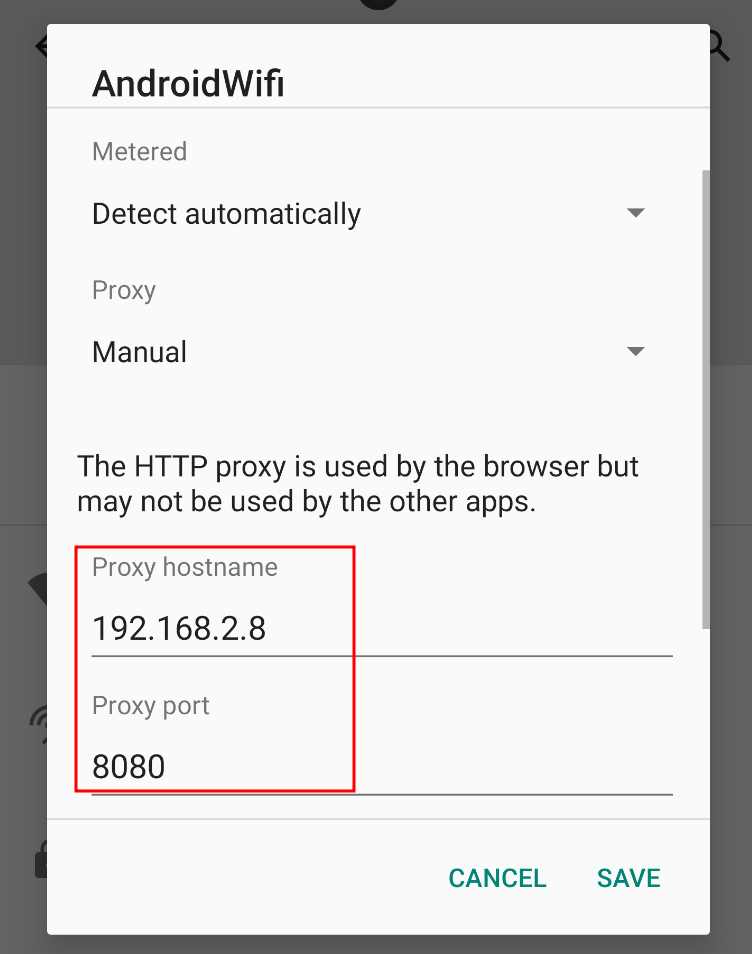
As a last step, head to Settings, Network & internet, Wi-Fi, click the gear icon (Settings) next to AndroidWifi, and then click the pencil icon (Edit) next to the Network details title. Set the hostname or IP address of the proxy server.
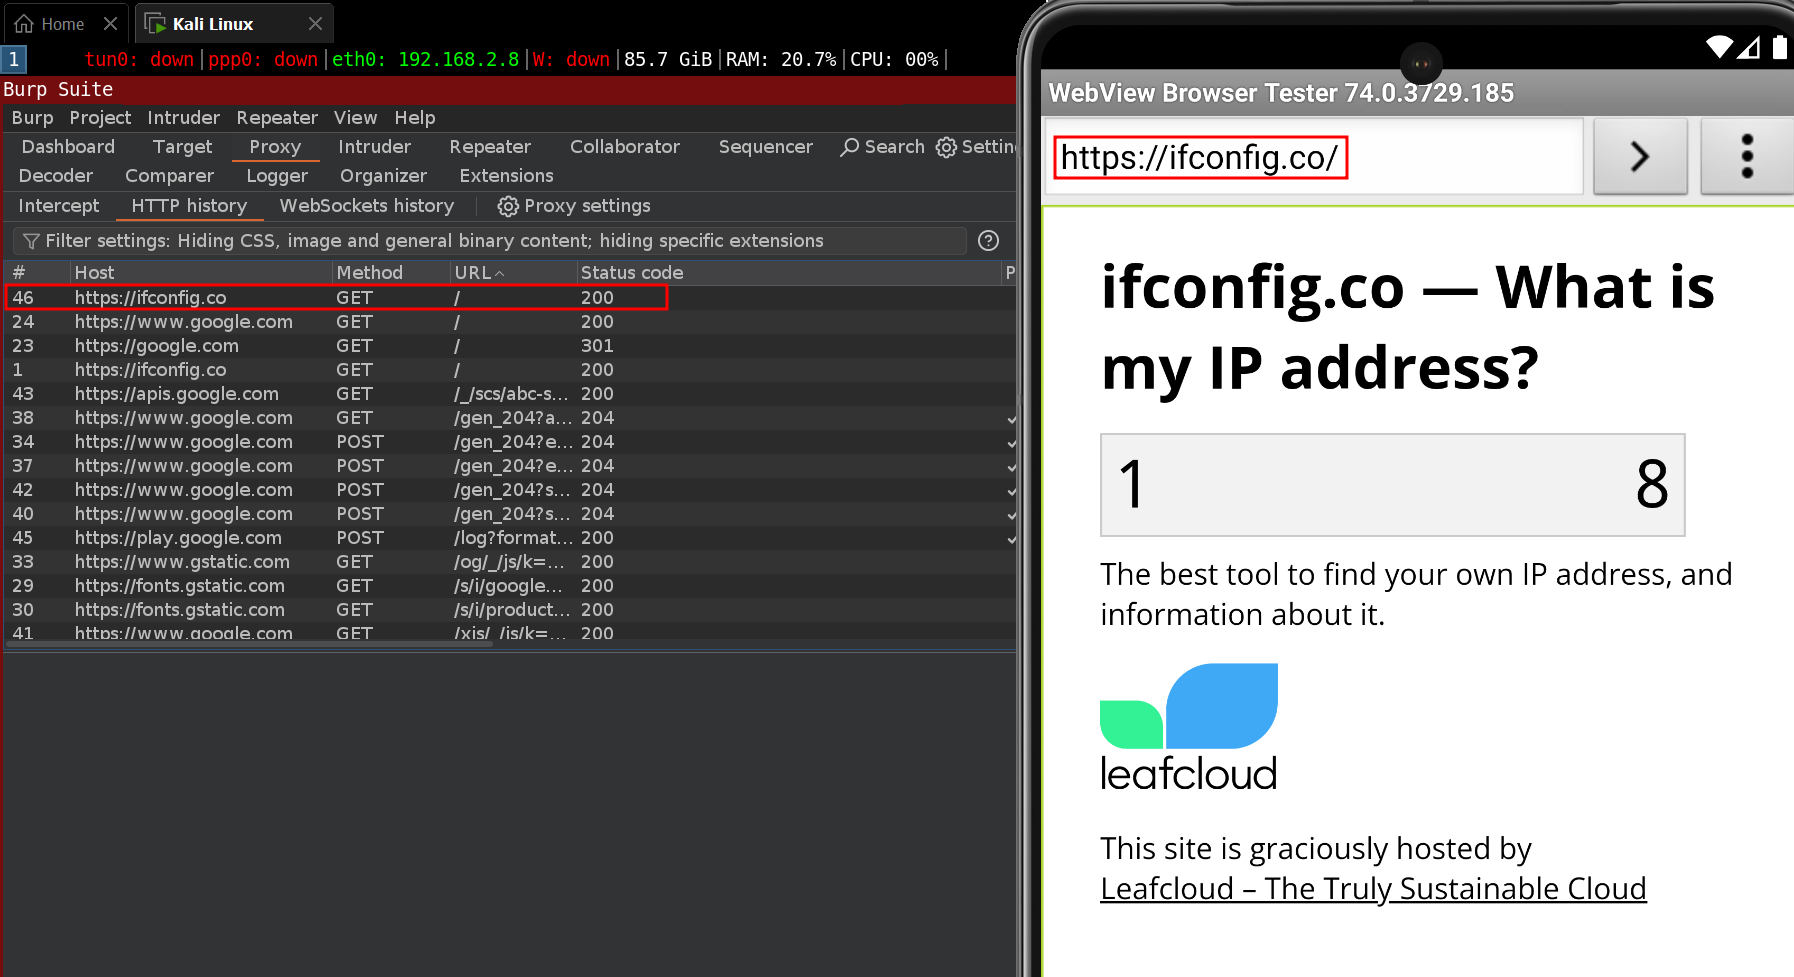
To verify that the traffic is being captured, visit a website, and the requests should appear in the proxy server's history, as demonstrated in the last screenshot.
Conclusion
In this guide, the AVD has been successfully prepared for Android penetration testing by setting up Android Studio, creating a virtual device, and rooting it with Magisk. Essential Magisk settings and modules have been configured to enhance testing capabilities, including hiding the Magisk app and enabling Zygisk for advanced modifications. Additionally, the AVD has been set up to route traffic through a proxy server, allowing for the interception and analysis of network communications. With this walkthrough completed, the AVD is now ready for penetration testing action!